File-System-Based Automated Bundle Generation
To use the automated bundle generation feature introduced in React on Rails v13.1.0, please upgrade to use Shakapacker v6.5.1 at least. If you are currently using Webpacker, please follow the migration steps available v6 upgrade. Then upgrade to Shakapacker 7 using v7 upgrade guide.
Configuration
Enable nested_entries for Shakapacker
To use the automated bundle generation feature, set nested_entries: true in the shakapacker.yml file like this.
The generated files will go in a nested directory.
default:
  ...
  nested_entries: true
For more details, see Configuration and Code section in shakapacker.
Example (dummy app):
nested_entries: truewith a differentsource_path: client/app. Seeconfig/shakapacker.ymlin the dummy app. Dummy shakapacker.yml
Configure Components Subdirectory
components_subdirectory is the name of the matched directories containing components that will be automatically registered for use by the view helpers.
For example, configure config/initializers/react_on_rails to set the name for components_subdirectory:
config.components_subdirectory = "ror_components"Now all React components inside the directories called ror_components will automatically be registered for usage with react_component and react_component_hash helper methods provided by React on Rails.
Example (dummy app): the configured components subdirectory is named
startupinstead ofror_components. Dummy initializer
Configure auto_load_bundle Option
For automated component registry, react_component and react_component_hash view helper method tries to load generated bundle for component from the generated directory automatically per auto_load_bundle option. auto_load_bundle option in config/initializers/react_on_rails configures the default value that will be passed to component helpers. The default is false, and the parameter can be passed explicitly for each call.
You can change the value in config/initializers/react_on_rails by updating it as follows:
config.auto_load_bundle = trueExample (dummy app):
auto_load_bundleis set totruein the same initializer. Dummy initializer
Location of generated files
Generated files will go to the following two directories:
- Pack files for entrypoint components will be generated in the
{Shakapacker.config.source_entry_path}/generateddirectory. - The interim server bundle file, which is only generated if you already have a server bundle entrypoint and have not set
make_generated_server_bundle_the_entrypointtotrue, will be generated in the{Pathname(Shakapacker.config.source_entry_path).parent}/generateddirectory.
Update .gitignore file
To avoid committing generated files to your version control system, please update .gitignore to include:
# Generated React on Rails packs
**/generated/**
Commit changes to server bundle entrypoint
If you already have an existing server bundle entrypoint and have not set make_generated_server_bundle_the_entrypoint to true, then pack generation will add an import statement to your existing server bundle entrypoint similar to:
// import statement added by react_on_rails:generate_packs rake task
import './../generated/server-bundle-generated.js';
We recommend committing this import statement to your version control system.
Example (dummy app): see the server bundle entrypoint import. Dummy server-bundle.js
Usage
Basic usage
Background
If the shakapacker.yml file is configured as instructed here, with the following configurations
default: &default
  source_path: app/javascript
  source_entry_path: packs
  public_root_path: public
  public_output_path: packs
  nested_entries: true
# And more
the directory structure will look like this
app/javascript:
  └── packs:               # sets up webpack entries
  │   └── application.js   # references FooComponentOne.jsx, BarComponentOne.jsx and BarComponentTwo.jsx in `../src`
  └── src:                 # any directory name is fine. Referenced files need to be under source_path
  │   └── Foo
  │   │   └── ...
  │   │   └── FooComponentOne.jsx
  │   └── Bar
  │   │   └── ...
  │   │   └── BarComponentOne.jsx
  │   │   └── BarComponentTwo.jsx
  └── stylesheets:
  │   └── my_styles.css
  └── images:
      └── logo.svg
Previously, many applications would use one pack (webpack entrypoint) for many components. In this example, theapplication.js file manually registers server components, FooComponentOne, BarComponentOne and BarComponentTwo.
import ReactOnRails from 'react-on-rails';
import FooComponentOne from '../src/Foo/FooComponentOne';
import BarComponentOne from '../src/Foo/BarComponentOne';
import BarComponentTwo from '../src/Foo/BarComponentTwo';

ReactOnRails.register({ FooComponentOne, BarComponentOne, BarComponentTwo });
Your layout would contain:
  <%= javascript_pack_tag 'application' %>
  <%= stylesheet_pack_tag 'application' %>
Now suppose you want to use bundle splitting to minimize unnecessary javascript loaded on each page, you would put each of your components in the packs directory.
app/javascript:
  └── packs:                   # sets up webpack entries
  │   └── FooComponentOne.jsx  # Internally uses ReactOnRails.register
  │   └── BarComponentOne.jsx  # Internally uses ReactOnRails.register
  │   └── BarComponentTwo.jsx  # Internally uses ReactOnRails.register
  └── src:                     # any directory name is fine. Referenced files need to be under source_path
  │   └── Foo
  │   │   └── ...
  │   └── Bar
  │   │   └── ...
  └── stylesheets:
  │   └── my_styles.css
  └── images:
      └── logo.svg
The tricky part is to figure out which bundles to load on any Rails view. Shakapacker's append_stylesheet_pack_tag and append_javascript_pack_tag view helpers enables Rails views to specify needed bundles for use by layout's call to javascript_pack_tag and stylesheet_pack_tag.
Solution
File-system-based automated pack generation simplifies this process with a new option for the view helpers.
Note: In the Background examples above, we used
BarComponentTwo. In the Solution below, we refer to the same component asSpecialComponentNotToAutoLoadBundleto emphasize that it is excluded from auto-loading. You do not need to rename your files.
For example, if you wanted to utilize our file-system based entrypoint generation for FooComponentOne and BarComponentOne, but not SpecialComponentNotToAutoLoadBundle (formerly BarComponentTwo) (for whatever reason), then...
-
Remove generated entrypoints from parameters passed directly to
javascript_pack_tagandstylesheet_pack_tag. -
Remove generated entrypoints from parameters passed directly to
append_javascript_pack_tagandappend_stylesheet_pack_tag.Your layout would now contain:
<%= javascript_pack_tag('SpecialComponentNotToAutoLoadBundle') %> <%= stylesheet_pack_tag('SpecialComponentNotToAutoLoadBundle') %> -
Create a directory structure where the components that you want to be auto-generated are within
ReactOnRails.configuration.components_subdirectory, which should be a subdirectory ofShakapacker.config.source_path:app/javascript: └── packs: │ └── SpecialComponentNotToAutoLoadBundle.jsx # Internally uses ReactOnRails.register └── src: │ └── Foo │ │ └── ... │ │ └── ror_components # configured as `components_subdirectory` │ │ └── FooComponentOne.jsx │ └── Bar │ │ └── ... │ │ └── ror_components # configured as `components_subdirectory` │ │ │ └── BarComponentOne.jsx │ │ └── something_else │ │ │ └── SpecialComponentNotToAutoLoadBundle.jsx-
You no longer need to register the React components within the
ReactOnRails.configuration.components_subdirectorynor directly add their bundles. For example, you can have a Rails view using three components:<%= react_component("FooComponentOne", {}, auto_load_bundle: true) %> <%= react_component("BarComponentOne", {}, auto_load_bundle: true) %> <% append_javascript_pack_tag('SpecialComponentNotToAutoLoadBundle') %> <%= react_component("SpecialComponentNotToAutoLoadBundle", {}) %>If a component uses multiple HTML strings for server rendering, the
react_component_hashview helper can be used on the Rails view, as illustrated below.<% foo_component_one_data = react_component_hash( "FooComponentOne", prerender: true, auto_load_bundle: true, props: {} ) %> <% content_for :title do %> <%= foo_component_one_data["title"] %> <% end %> <%= foo_component_one_data["componentHtml"] %>The default value of the
auto_load_bundleparameter can be specified by settingconfig.auto_load_bundleinconfig/initializers/react_on_rails.rband thus removed from each call toreact_component.
-
Layout Integration with Auto-Loading
When using auto_load_bundle: true, your Rails layout needs to include empty pack tag placeholders where React on Rails will inject the component-specific CSS and JavaScript bundles automatically:
<!DOCTYPE html>
<html>
  <head>
    <!-- Your regular head content -->
    <%= csrf_meta_tags %>
    <%= csp_meta_tag %>

    <!-- Empty pack tags - React on Rails injects component CSS/JS here -->
    <%= stylesheet_pack_tag %>
    <%= javascript_pack_tag %>
  </head>
  <body>
    <%= yield %>
  </body>
</html>
How it works:
-
Component calls automatically append bundles: When you use
<%= react_component("ComponentName", props, auto_load_bundle: true) %>in a view, React on Rails automatically callsappend_javascript_pack_tag "generated/ComponentName"andappend_stylesheet_pack_tag "generated/ComponentName"(in static/production modes). -
Layout renders appended bundles: The empty
<%= stylesheet_pack_tag %>and<%= javascript_pack_tag %>calls in your layout are where the appended component bundles get rendered. -
No manual bundle management: You don't need to manually specify which bundles to load - React on Rails handles this automatically based on which components are used in each view.
Example with multiple components:
If your view contains:
<%= react_component("HelloWorld", @hello_world_props, auto_load_bundle: true) %>
<%= react_component("HeavyMarkdownEditor", @editor_props, auto_load_bundle: true) %>
React on Rails automatically generates HTML equivalent to:
<!-- In <head> where <%= stylesheet_pack_tag %> appears -->
<%= stylesheet_pack_tag "generated/HelloWorld" %>
<%= stylesheet_pack_tag "generated/HeavyMarkdownEditor" %>

<!-- Before </body> where <%= javascript_pack_tag %> appears -->
<%= javascript_pack_tag "generated/HelloWorld" %>
<%= javascript_pack_tag "generated/HeavyMarkdownEditor" %>
This enables optimal bundle splitting where each page only loads the CSS and JavaScript needed for the components actually used on that page.
Complete Working Example
Here's a step-by-step example showing how to set up file-system-based automated bundle generation from scratch:
1. Configure Shakapacker
In config/shakapacker.yml:
default: &default
  source_path: app/javascript
  source_entry_path: packs
  public_root_path: public
  public_output_path: packs
  nested_entries: true # Required for auto-generation
  cache_manifest: false
2. Configure React on Rails
In config/initializers/react_on_rails.rb:
ReactOnRails.configure do |config|
  config.components_subdirectory = "ror_components"  # Directory name for auto-registered components
  config.auto_load_bundle = true                     # Enable automatic bundle loading
  config.server_bundle_js_file = "server-bundle.js"
end
3. Directory Structure
Set up your directory structure like this:
app/javascript/
└── src/
    ├── HelloWorld/
    │   ├── HelloWorld.module.css           # Component styles
    │   └── ror_components/                 # Auto-registration directory
    │       └── HelloWorld.jsx              # React component
    └── HeavyMarkdownEditor/
        ├── HeavyMarkdownEditor.module.css  # Component styles
        └── ror_components/                 # Auto-registration directory
            └── HeavyMarkdownEditor.jsx     # React component
4. Component Implementation
app/javascript/src/HelloWorld/ror_components/HelloWorld.jsx:
import React from 'react';
import styles from '../HelloWorld.module.css';

const HelloWorld = ({ name }) => (
  <div className={styles.hello}>
    <h1>Hello {name}!</h1>
    <p>Welcome to React on Rails with auto-registration!</p>
  </div>
);

export default HelloWorld;app/javascript/src/HeavyMarkdownEditor/ror_components/HeavyMarkdownEditor.jsx:
import React, { useState, useEffect } from 'react';
import styles from '../HeavyMarkdownEditor.module.css';

const HeavyMarkdownEditor = ({ initialContent = '# Hello\n\nStart editing!' }) => {
  const [content, setContent] = useState(initialContent);
  const [ReactMarkdown, setReactMarkdown] = useState(null);
  const [remarkGfm, setRemarkGfm] = useState(null);

  // Dynamic imports for SSR compatibility
  useEffect(() => {
    const loadMarkdown = async () => {
      const [{ default: ReactMarkdown }, { default: remarkGfm }] = await Promise.all([
        import('react-markdown'),
        import('remark-gfm'),
      ]);
      setReactMarkdown(() => ReactMarkdown);
      setRemarkGfm(() => remarkGfm);
    };
    loadMarkdown();
  }, []);

  if (!ReactMarkdown) {
    return <div className={styles.loading}>Loading editor...</div>;
  }

  return (
    <div className={styles.editor}>
      <div className={styles.input}>
        <h3>Markdown Input:</h3>
        <textarea value={content} onChange={(e) => setContent(e.target.value)} className={styles.textarea} />
      </div>
      <div className={styles.output}>
        <h3>Preview:</h3>
        <div className={styles.preview}>
          <ReactMarkdown remarkPlugins={[remarkGfm]}>{content}</ReactMarkdown>
        </div>
      </div>
    </div>
  );
};

export default HeavyMarkdownEditor;
5. Rails Layout
app/views/layouts/application.html.erb:
<!DOCTYPE html>
<html>
  <head>
    <title>React on Rails Auto-Registration Demo</title>
    <meta name="viewport" content="width=device-width,initial-scale=1">
    <%= csrf_meta_tags %>
    <%= csp_meta_tag %>

    <!-- Empty pack tags - React on Rails injects component CSS/JS here -->
    <%= stylesheet_pack_tag %>
    <%= javascript_pack_tag %>
  </head>

  <body>
    <%= yield %>
  </body>
</html>
6. Rails Views and Controller
app/controllers/hello_world_controller.rb:
class HelloWorldController < ApplicationController
  def index
    @hello_world_props = { name: 'Auto-Registration' }
  end

  def editor
    @editor_props = {
      initialContent: "# Welcome to the Heavy Editor\n\nThis component demonstrates:\n- Dynamic imports for SSR\n- Bundle splitting\n- Automatic CSS loading"
    }
  end
endapp/views/hello_world/index.html.erb:
<%= react_component("HelloWorld", @hello_world_props, prerender: true) %>app/views/hello_world/editor.html.erb:
<%= react_component("HeavyMarkdownEditor", @editor_props, prerender: true) %>7. Generate Bundles
Run the pack generation command:
bundle exec rake react_on_rails:generate_packsThis creates:
app/javascript/packs/generated/HelloWorld.jsapp/javascript/packs/generated/HeavyMarkdownEditor.js
8. Update .gitignore
# Generated React on Rails packs
**/generated/**
9. Start the Server
Now when you visit your pages, React on Rails automatically:
- Loads only the CSS and JS needed for components on each page
- Registers components without manual
ReactOnRails.register()calls - Enables optimal bundle splitting and caching
Bundle sizes in this example (measured from browser dev tools):
- HelloWorld: 1.1MB total resources (50KB component-specific code + shared React runtime)
- HelloWorld.js: 10.0 kB
- HelloWorld.css: 2.5 kB
- Shared runtime: ~1.1MB (React, webpack runtime)
- HeavyMarkdownEditor: 2.2MB total resources (2.7MB with markdown libraries)
- HeavyMarkdownEditor.js: 26.5 kB
- HeavyMarkdownEditor.css: 5.5 kB
- Markdown libraries: 1,081 kB additional
- Shared runtime: ~1.1MB (React, webpack runtime)
Bundle splitting benefit: Each page loads only its required components - the HelloWorld page doesn't load the heavy markdown libraries, saving ~1.1MB (50% reduction)!
Performance Screenshots
HelloWorld (Lightweight Component):

HeavyMarkdownEditor (Heavy Component):
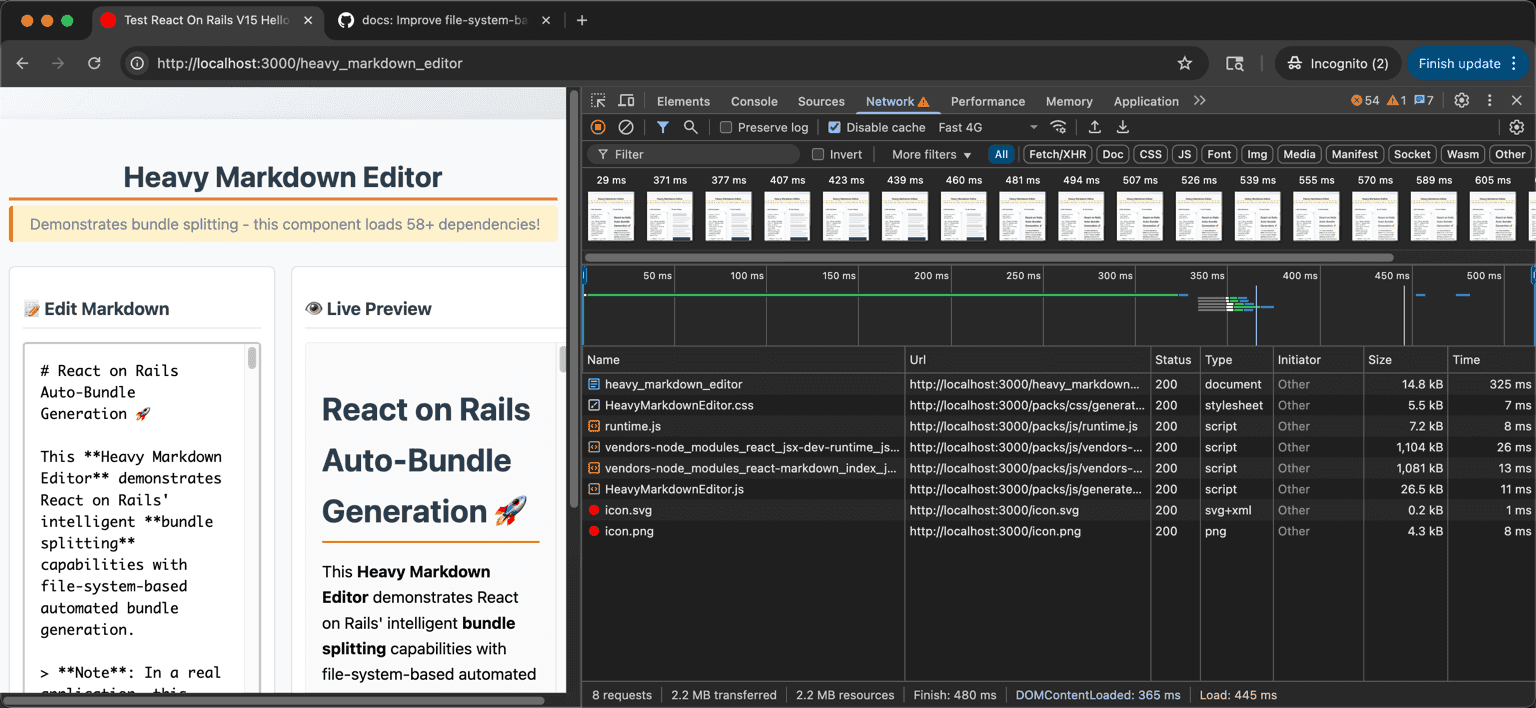
Screenshots show browser dev tools network analysis demonstrating the dramatic difference in bundle sizes and load times between the two components.
Server Rendering and Client Rendering Components
If server rendering is enabled, the component will be registered for usage both in server and client rendering. To have separate definitions for client and server rendering, name the component files ComponentName.server.jsx and ComponentName.client.jsx. The ComponentName.server.jsx file will be used for server rendering and the ComponentName.client.jsx file for client rendering. If you don't want the component rendered on the server, you should only have the ComponentName.client.jsx file.
Example (dummy app): paired files such as
ReduxApp.client.jsxandReduxApp.server.jsx, andRouterApp.client.jsxandRouterApp.server.jsx.
Once generated, all server entrypoints will be imported into a file named [ReactOnRails.configuration.server_bundle_js_file]-generated.js, which in turn will be imported into a source file named the same as ReactOnRails.configuration.server_bundle_js_file. If your server bundling logic is such that your server bundle source entrypoint is not named the same as your ReactOnRails.configuration.server_bundle_js_file and changing it would be difficult, please let us know.
IMPORTANT
When specifying separate definitions for client and server rendering, you need to delete the generalized ComponentName.jsx file.
Using Automated Bundle Generation Feature with already defined packs
As of version 13.3.4, bundles inside directories that match config.components_subdirectory will be automatically added as entrypoints, while bundles outside those directories need to be manually added to the Shakapacker.config.source_entry_path or Webpack's entry rules.
Troubleshooting
Common Issues and Solutions
1. "Component not found" errors
Problem: react_component helper throws "Component not found" error.
Solutions:
- Ensure your component is in a
ror_componentsdirectory (or your configuredcomponents_subdirectory) - Run
rake react_on_rails:generate_packsto generate the component bundles - Check that your component exports a default export:
export default MyComponent; - Verify the component name matches the directory structure
2. CSS not loading (FOUC - Flash of Unstyled Content)
Problem: Components load but CSS styles are missing or delayed.
Important: FOUC (Flash of Unstyled Content) only occurs with HMR (Hot Module Replacement). Static and production modes work perfectly without FOUC.
Solutions:
- Development with HMR (
./bin/dev): FOUC is expected behavior due to dynamic CSS injection - not a bug - Development static (
./bin/dev static): No FOUC - CSS is extracted to separate files like production - Production (
./bin/dev prod): No FOUC - CSS is extracted and optimized - Layout: Verify your layout includes empty
<%= stylesheet_pack_tag %>placeholder for CSS injection - Component imports: Check that CSS files are properly imported:
import styles from './Component.module.css';
Key insight: Choose your development mode based on your current needs:
- Use HMR for fastest development (accept FOUC)
- Use static mode when testing styling without FOUC
- Use production mode for final testing
3. "document is not defined" errors during SSR
Problem: Server-side rendering fails with browser-only API access.
Solutions:
- Use dynamic imports for browser-only libraries:
useEffect(() => { const loadLibrary = async () => { const { default: BrowserLibrary } = await import('browser-library'); setLibrary(() => BrowserLibrary); }; loadLibrary(); }, []); - Provide fallback/skeleton components during loading
- Consider client-only rendering: use
ComponentName.client.jsxfiles only
4. Bundles not being generated
Problem: Running rake react_on_rails:generate_packs doesn't create files.
Solutions:
- Verify
nested_entries: trueinshakapacker.yml - Check that
components_subdirectoryis correctly configured - Ensure components are in the right directory structure:
src/ComponentName/ror_components/ComponentName.jsx - Make sure you're using the correct source path in Shakapacker config
5. Manual pack tags not working after switching to auto-loading
Problem: Manually specified javascript_pack_tag or stylesheet_pack_tag break.
Solutions:
- Remove specific pack names from manual pack tags: use
<%= javascript_pack_tag %>instead of<%= javascript_pack_tag 'specific-bundle' %> - Remove manual
append_javascript_pack_tagcalls -react_componentwithauto_load_bundle: truehandles this automatically - Delete any client bundle entry files (e.g.,
client-bundle.js) that manually register components
6. Bundle size issues
Problem: Large bundles loading when not needed.
Solutions:
- Use component-level bundle splitting - each page loads only needed components
- Implement dynamic imports for heavy dependencies
- Check bundle analysis with
RAILS_ENV=production NODE_ENV=production bundle exec rails assets:precompileand examine generated bundle sizes - Consider code splitting within heavy components
7. Development vs Production differences
Problem: Works in development but fails in production.
Solutions:
- CSS: Production extracts CSS to separate files, development might inline it
- Source maps: Check if source maps are causing issues in production
- Minification: Some code might break during minification - check console for errors
- Environment: Use
bin/dev prodto test production-like assets locally
8. Installation order issues
Problem: React on Rails installation fails or behaves unexpectedly.
Solutions:
- Correct order: Always install Shakapacker BEFORE React on Rails
bundle add shakapacker rails shakapacker:install bundle add react_on_rails rails generate react_on_rails:install - If you installed in wrong order, uninstall and reinstall in correct sequence
Debug Mode
To debug auto-loading behavior, temporarily add logging to see what bundles are being loaded:
<!-- Temporarily add this to your layout to see what gets loaded -->
<%= debug(content_for(:javascript_pack_tags)) %>
<%= debug(content_for(:stylesheet_pack_tags)) %>
This helps verify that components are correctly appending their bundles.