Using GraphQL in Ruby on Rails
Introduction
Born at Facebook, GraphQL empowers clients to precisely request the data they need through a flexible query language and efficient runtime, revolutionizing API development. GraphQL's query structure enables granular field selection from resources, ensuring responses contain only the data specified in the query.
How GraphQL is different from REST APIs
GraphQL is a query language and runtime used to fetch data from APIs. It differs from traditional REST APIs in several key ways:
Data Fetching:
GraphQL: Clients have fine-grained control over what data they request. They can specify precisely which fields they need, reducing unnecessary data transfer.
REST: Servers determine the structure of the response, often resulting in either over-fetching (too much data) or under-fetching (not enough data).
Endpoints:
GraphQL: Uses a single endpoint for all queries and mutations, simplifying client-side development.
REST: Requires multiple endpoints, one for each resource or action, which can create complexity and maintenance overhead.
Schema:
GraphQL: Has a strongly typed schema that defines the available data types and their relationships, ensuring consistency and making development more straightforward.
REST: Often lacks a formal schema or relies on informal documentation, leading to misunderstandings and integration issues.
Versioning:
GraphQL: Allows the schema to evolve without breaking existing clients, making it easier to adapt APIs as requirements change.
REST: Versioning often requires maintaining multiple endpoints or using versioning headers, which can be cumbersome.
Over-fetching and Under-fetching:
GraphQL: Minimizes both over-fetching and under-fetching by allowing clients to request the data they need precisely.
REST: Prone to over-fetching due to fixed endpoints and responses, and under-fetching often requires multiple API calls to gather related data.
GraphQL schema and data types
Before diving into GraphQL usage in Rails, understanding the schema and data types in GraphQL is crucial.
A GraphQL schema serves as the blueprint for your API, defining the available data, its structure, and how clients can interact with it. It is crucial in ensuring consistency, predictability, and efficient data fetching.
Here are its essential elements:
Types:
Scalar types: Represent fundamental data values (e.g., String, Int, Boolean).
Object types: Represent complex entities with multiple fields.
Interface types: Define shared fields for multiple object types.
Union types: Represent values that can be one of several object types.
Enum types: Represent predefined sets of values.
Input types: Define the shape of arguments for queries and mutations.
Queries:
Represent operations that retrieve data from the server.
Clients specify the fields they need in their queries.
Mutations:
- This empowers us to manipulate data: adding, updating, or removing it. Think of it as the "CRUD" operations of create, update, and destroy in action.
Fields:
Represent individual pieces of data within object types.
Each field has a name, a type, and optional arguments.
Arguments:
Provide a way to filter or customize data retrieval.
They are used in both queries and mutations.
Schema Definition:
Schemas are typically defined using the GraphQL Schema Definition Language (SDL).
SDL is a human-readable syntax for describing the schema's structure.
An example of GraphQL type and query is as follows:
type User {
  id: ID!
  name: String!
  email: String!
}

type Query {
  users: [User!]!
  user(id: ID!): User
}
Let's create a Rails application with GraphQL.
Building a Rails application with GraphQL
Create a new Rails app
Let's create a new Rails application called demo_graphql on our systems.
I use Rails 7.1.2
and
Ruby 3.1.2 versions to create the new Rails application.
I prefer the PostgreSQL database;
you can use the default SQLite3
or
the database of your choice.
Execute the below command on your terminal.
> rails new demo_graphql -d postgresqlPlease navigate to the project directory,
and
let's create Post
and
Comment models where a post has many comments.
> cd demo_graphql

> rails g model Post title description:text featured_image

> rails g model Comment title content:text post:references
Once the models are generated,
add the association has_many: :comments in the
app/models/post.rb file.
class Post < ApplicationRecord
  has_many: :comments
end
To verify the models and associations are correct, create the database and run the migrations.
> rake db:create
Created database 'demo_graphql_development'
Created database 'demo_graphql_test'

> rake db:migrate
== 20240106111254 CreatePosts: migrating ======================================
-- create_table(:posts)
   -> 0.0058s
== 20240106111254 CreatePosts: migrated (0.0059s) =============================

== 20240106111859 CreateComments: migrating ===================================
-- create_table(:comments)
   -> 0.0120s
== 20240106111859 CreateComments: migrated (0.0121s) ==========================
To verify the GraphQL API,
we need Post
and
Comment data in our DB.
Data can be created in the rails console,
or it can be created using the seed file.
Open the db/seeds.rb file in your editor
and
add the below lines:
# db/seeds.rb

post = Post.create!(
  title: "First post",
  description: "First post description",
)

Comment.create!(
  [
    {
      title: "1st comment",
      content: "This is my 1st comment",
      post: post
    },
    {
      title: "2nd comment",
      content: "This is my 2nd comment",
      post: post
    },
    {
      title: "3rd comment",
      content: "This is my 3rd comment",
      post: post
    },
    {
      title: "4th comment",
      content: "This is my 4th comment",
      post: post
    },
    {
      title: "5th comment",
      content: "This is my 5th comment",
      post: post
    }
  ]
)
Run rake db:seed on your terminal,
and
it should pass without raising any errors.
Add GraphQL gem to Rails app
To integrate GraphQL functionality into your Rails application, leverage the graphql-ruby gem. It streamlines the process by adding essential files.
Add the gem graphql to your Gemfile
or
execute the below commands.
> bundle add graphql

> rails generate graphql:install
Note:
The graphql:install command will execute successfully
and
render the below message.
Make sure to execute the bundle install as mentioned in the message.
........
........
    insert  app/graphql/types/base_interface.rb
    insert  app/graphql/demo_graphql_schema.rb
Gemfile has been modified, make sure you `bundle install`
The graphql:install command created an app/graphql/demo_graphql_schema.rb file.
This acts as the entry point for all queries
and
mutations,
outlining their respective locations
and
operations within the GraphQL schema.
The command modified the config/routes.rb file.
The following code was added to the routes file.
Rails.application.routes.draw do
    if Rails.env.development?
      mount GraphiQL::Rails::Engine, at: "/graphiql", graphql_path: "/graphql"
    end
    post "/graphql", to: "graphql#execute"

    ....
    ....
    get "up" => "rails/health#show", as: :rails_health_check
end
The mount GraphiQL::Rails::Engine, at: "/graphiql",
makes GraphiQL accessible at a specific path within your application,
specified with the at: attribute /graphiql.
It directs all queries to the graphql#execute method,
specified using the graphql_path.
mount embeds GraphiQL,
a powerful in-browser GraphQL IDE,
directly into your Rails development environment
and
provides a visual interface for exploring
and
testing your GraphQL API.
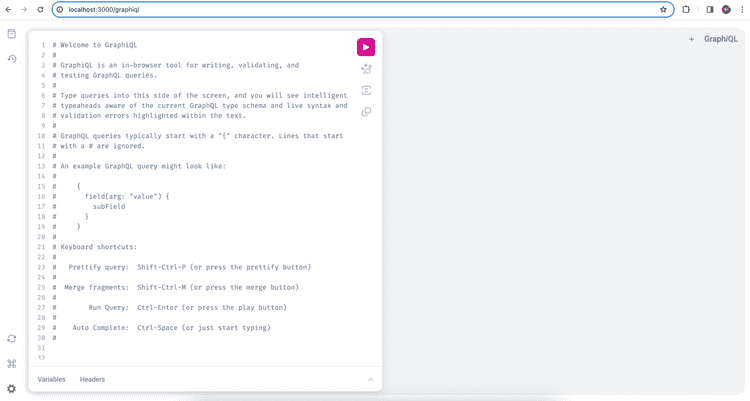
You can verify the /graphiql endpoint by starting the server locally
and
navigating to localhost:3000/graphiql endpoint.
You should be able to see the below page:
GraphiQL's streamlined interface couples query composition on the left with result display on the right. Syntax highlighting and typeahead hinting, powered by your schema, collaborate to ensure query validity.
Write and execute GraphQL query with GraphiQL
Create Types for Post and Comment
GraphQL depends on its Types
and
Schema to validate
and
respond to queries.
We have the Post
and
Comment models in place.
Let's create a PostType
and
CommentType under app/graphql/types/ directory.
To create the types,
execute the below commands in your terminal.
> rails generate graphql:object Post id:ID! title:String! description:String!
  create  app/graphql/types/post_type.rb

> rails generate graphql:object Comment id:ID! title:String! content:String
  create  app/graphql/types/comment_type.rb
With this command,
you'll craft a GraphQL object type called Post and Comment,
meticulously defining its core structure:
Unique identifier: An
idfield with theIDtype securely anchors each post and comment.Content essentials:
titleanddescriptionfields, both of typeString, capture its essence.Strict data integrity: The exclamation marks (
!) enforce non-nullability, ensuring these fields always return meaningful values, never null. This acts as a built-in validation mechanism, guaranteeing consistency and predictability when queried.
Defining non-nullable fields establishes clear expectations for data availability and integrity, fostering confidence in GraphQL interactions.
Next,
you need to create a PostInput
and
CommentInput type to define the arguments required to create a post
and
comment.
You must create a input folder under the
app/graphql/types/ directory.
Under this directory,
create two files,
post_input_type.rb
and
comment_input_type.rb.
> mkdir ~/demo_graphql/app/graphql/types/input

> nano ~/demo_graphql/app/graphql/types/input/post_input_type.rb

> nano ~/demo_graphql/app/graphql/types/input/comment_input_type.rb
Once the above files are generated, add the code below to the respective files.
# app/graphql/types/input/post_input_type.rb
module Types
  module Input
    class PostInputType < Types::BaseInputObject
      argument :title, String, required: true
      argument :description, String, required: true
    end
  end
end
# app/graphql/types/input/comment_input_type.rb
module Types
module Input
class CommentInputType < Types::BaseInputObject
argument :title, String, required: true
argument :content, String
end
end
endCreate Queries for Posts and Comments
Let's create two queries, one to fetch the single post we created and another to fetch all the comments.
First,
create a queries directory to house all queries.
Next,
create a base_query.rb file under this directory.
> mkdir ~/demo_graphql/app/graphql/queries

> nano ~/demo_graphql/app/graphql/queries/base_query.rb
Implement a BaseQuery class within base_query.rb to serve as a base class
for other query classes,
promoting code organization
and
inheritance.
# app/graphql/queries/base_query.rb

module Queries
  class BaseQuery < GraphQL::Schema::Resolver
  end
end
Next, create a fetch_post.rb
and
fetch_comments.rb file under the queries directory.
> nano ~/demo_graphql/app/graphql/queries/fetch_post.rb

> nano ~/demo_graphql/app/graphql/queries/fetch_comments.rb
Add the following code to the fetch_post file to define
the return object type
and
resolve the requested post.
# app/graphql/queries/fetch_post.rb

module Queries
  class FetchPost < Queries::BaseQuery
    type Types::PostType, null: false
    argument :id, ID, required: true

    def resolve(id:)
      Post.find(:id)
    end
  end
end
Add the following code to the fetch_comments file to define
the return object type
and
resolve the requested comments.
# app/graphql/queries/fetch_comments.rb

module Queries
  class FetchComments < Queries::BaseQuery
    type [Types::CommentType], null: false

    def resolve
      Comment.all.order(created_at: :desc)
    end
  end
end
The Queries::FetchPost class,
residing in the fetch_post.rb
and
extending Queries::BaseQuery,
enforces a return type of PostType,
ensuring type safety
and
adherence to the defined schema.
The Queries::FetchPost also contains a resolve method that returns the particular post.
To integrate your FetchPost query into the GraphQL schema,
locate the query_type.rb file,
responsible for managing query fields
and
resolvers
and updating them accordingly.
module Types
  class QueryType < Types::BaseObject
    field :fetch_post, resolver: Queries::FetchPost
    field :fetch_comments, resolver: Queries::FetchComments
  end
end
By configuring a resolver for the fetch_post field using Queries::FetchPost#resolve,
you've established a clear path for query execution.
Incoming fetch_post calls seamlessly delegate to the resolve method for fulfilment.
Similarly,
you need to add the resolver for the fetch comments query.
Execute the fetch queries
Your application is now ready to fetch the posts
and
comments.
Navigate to your browser
and
hit the localhost:3000/graphiql endpoint.
On the left side,
add the query below.
query {
  fetchPost(id: 1) {
    id
    title
    description
    createdAt
    updatedAt
  }
}
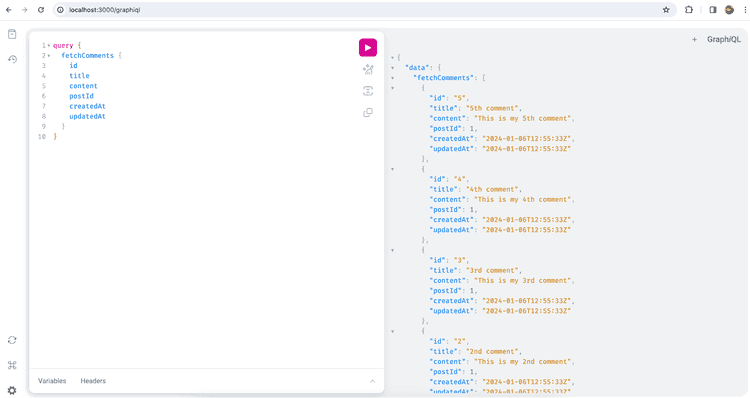
Similarly, you can fetch the comments by changing the query on the left side.
query {
  fetchComments {
    id
    title
    content
    postId
    createdAt
    updatedAt
  }
}
Well,
the postId does not add any value to the API response.
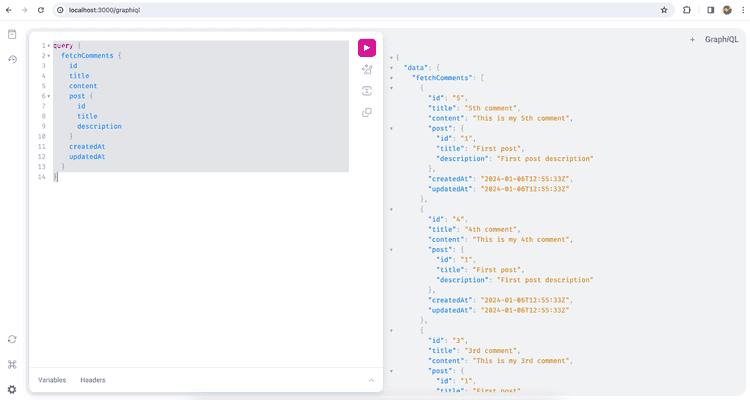
We can change it to return post details.
To do this,
you must modify the app/graphql/types/comment_type.rb file to include
the post field.
You need to mention the data type of the post field as Types::PostType.
# app/graphql/types/comment_type.rb

module Types
  class CommentType < Types::BaseObject
    field :id, ID, null: false
    field :title, String
    field :content, String
    field :post_id, Integer, null: false
    field :post, Types::PostType, null: false
    field :created_at, GraphQL::Types::ISO8601DateTime, null: false
    field :updated_at, GraphQL::Types::ISO8601DateTime, null: false
  end
end
Modify your query to include the post
and
its fields in the fetchComments as below:
query {
  fetchComments {
    id
    title
    content
    post {
      id
      title
      description
    }
    createdAt
    updatedAt
  }
}
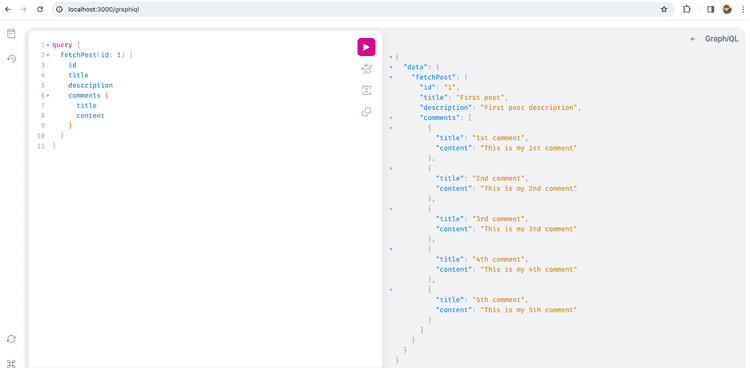
To fetch the post
and
all the comments on the post,
you need to change the app/graphql/types/post_type.rb file to include
all the comments.
# app/graphql/types/post_type.rb

module Types
  class PostType < Types::BaseObject
    field :id, ID, null: false
    field :title, String
    field :description, String
    field :comments, [Types::CommentType], null: false
    field :created_at, GraphQL::Types::ISO8601DateTime, null: false
    field :updated_at, GraphQL::Types::ISO8601DateTime, null: false
  end
end
Create GraphQL Mutations
When you need to shake things up on the server,
GraphQL's mutation types offer a structured way to make those changes,
keeping data transformations organized
and
predictable.
Mutations in GraphQL can be related to POST,
PUT,
PATCH,
and
DELETE requests of REST APIs.
To create a Post,
you need to add a create_post.rb file in the app/graphql/mutations
directory.
> nano ~/demo_graphql/app/graphql/mutations/create_post.rbThen,
add the below code to the create_post.rb file.
module Mutations
  class CreatePost < Mutations::BaseMutation
    argument :params, Types::Input::PostInputType, required: true

    field :post, Types::PostType, null: false

    def resolve(params:)
      post_params = Hash params

      { post: Post.create!(post_params) }
    end
  end
end
By defining Mutations::CreatePost as a subclass of Mutations::BaseMutation,
you've established a structured approach for adding posts.
It adheres to strict input expectations (requiring params of PostInputType)
and
guarantees a non-null note field of PostType in the response.
To make Mutations::CreatePost accessible within the GraphQL schema,
update the mutation_type.rb file,
which is responsible for managing mutation fields.
Attach it using the mutation: keyword to ensure proper invocation.
module Types
  class MutationType < Types::BaseObject
    field :create_post, mutation: Mutations::CreatePost
  end
end
By configuring a resolver for the create_post field using Mutations::CreatePost#resolve,
you've established a clear path for mutation execution.
Incoming create_post calls seamlessly delegate
to the resolve method for post creation.
To test post creation,
navigate to localhost:3000/graphiql in your browser.
In the left side of the editor,
type in the following query:
mutation {
  createPost(input: { params: { title: "GraphQL blog", description: "GraphQL and Ruby on Rails"  }}) {
    post {
      id
      title
      description
    }
  }
}
Run the mutation in GraphiQL, and you’ll see the following results in the output.
Conclusion
GraphQL not only enhances API capabilities but also enriches the development process itself. Its type-safe schema, intuitive tooling, and streamlined testing contribute to a productive and enjoyable experience for Rails developers. Unlock this potential and discover a more efficient and fulfilling way to build web applications.
I have created a Rails application using the above steps. Please refer to this repository.


